


Examples, recipes, and best practices to creating shipping notifications
Consumers on average check the status of their order 3-4 times. Whether it’s genuine excitement over awaiting their new purchase or concern on whether it will arrive in time for a special event, pre-parcel anxiety is real. Keeping your customers up-to-date on the status and whereabouts of their orders is best practice to avoid “where is my order?!” complaints.
In this post, we’ll show you how to set up shipping emails using Wonderment and Klaviyo flows.
🎥 Video tutorial
📘 Table of contents:
- What type of shipping-related emails can you send with Wonderment?
- How to set up your first Klaviyo flow
- Best practices to create “shipping delay” flows
- Advanced segmentation
- Using Klaviyo to send internal notifications
- Using meta-data tags to personalize your shipping-related emails
- Using the In-Transit event
- Extra resources
1. What type of shipping-related emails does Wonderment support?
With Wonderment’s Klaviyo integration, you can send customer emails based on any type of common shipping status, such as:
- Shipment Confirmed / Label Created (e.g. “Here’s your tracking number”)
- In Transit (e.g. “Your order has shipped!”)
- Stalled (e.g. “ut-oh, your order is delayed”)
- Out for Delivery (e.g. “Woo-hoo, your order is arriving soon.”)
- Delivered (e.g. "Congrats, your package has arrived!”)
- Delivery error (e.g “Seems to be a problem with your mailing address”)
Most customers expect to receive a notification when a package ships and is on its way. To go above and beyond, you can use Wonderment to notify your customers when the package is out for delivery, delivered, and of course, if there are any delays or issues.
You can even use our shipping events to trigger other post-purchase emails, such as using the In Transit event to send customers nurturing content before the package arrives, or ask customers for feedback 3 days after an order has been delivered. Wonderment’s shipping events avoid you having to guess on when customers should be getting any email or set generic time-based flows, enabling you to be more accurate and timely with your communication.
To learn more, here is the full list of supported shipping events Wonderment sends to Klaviyo.
2. Setting up your first Klaviyo flows
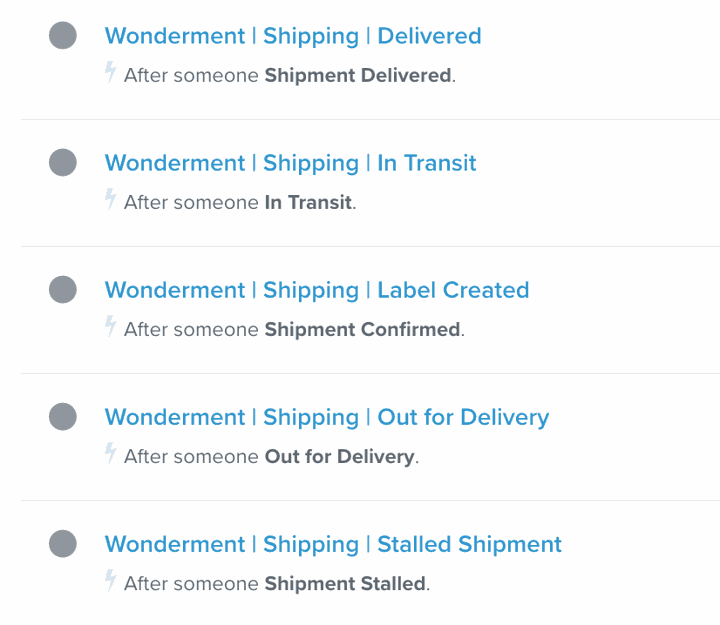
Here are just a few examples of the shipping-related flows I have set up in Klaviyo. It’s totally up to you how many events you would like to use. We recommend creating one flow per event, so you can keep track of each email separately and see its performance.
Important: Before you turn on any shipping emails in Klaviyo, you may want to disable Shopify’s default shipping emails, so customers are not receiving duplicate emails.
Note: Unless you are on Shopify Plus, you cannot disable Shopify’s Shipping Confirmation email. We advise to only create a Shipment Confirmed email in Klaviyo if you are a Plus store. Otherwise, follow these instructions to disable the other default shipping notifications in your Shopify account.
A. First, enable events in Wonderment
Step 1: In order to build flows like this in Klaviyo, you must first select the events you would like to use in your Klaviyo flows by going into Wonderment > Settings.
Next, check the box for every shipping event you would like to have available in Klaviyo. There is no harm to having all options on by default, it’s simply a preference.
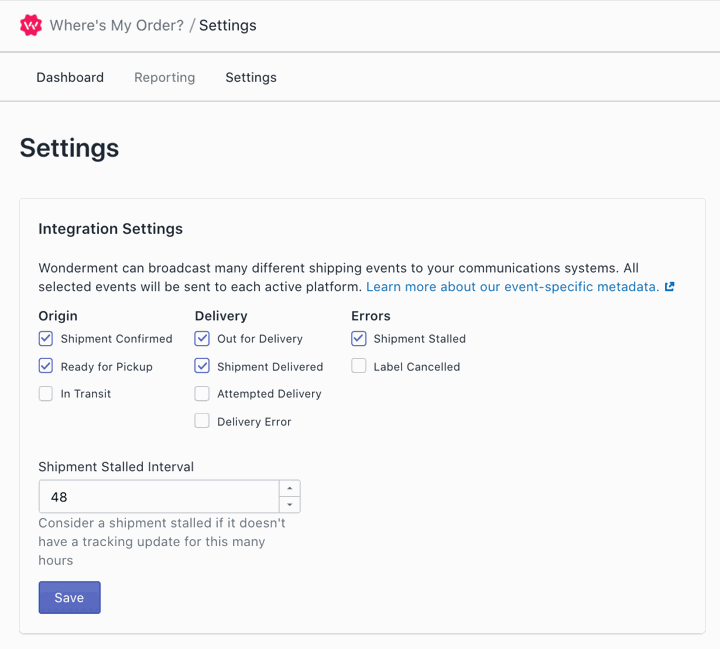
Once you check off all the events you’d like to use, click Save.
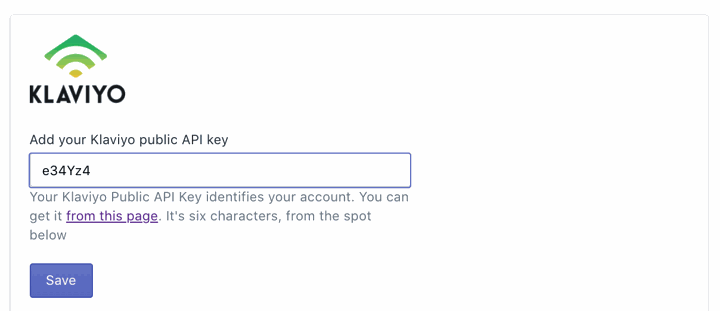
Step 2: Next, while still in Wonderment Settings, scroll down to ensure your six-character Klaviyo Public API key is populated in the Klaviyo integration field. We pull in your Klaviyo key for you automatically, but in case this field is blank, you can find your API key in Klaviyo, go to Account > Settings > API Keys and you’ll find it listed at the top of the page under Public API Key / Site ID.
B. Use Metric-type Trigger Klaviyo Flows for all Wonderment shipping events
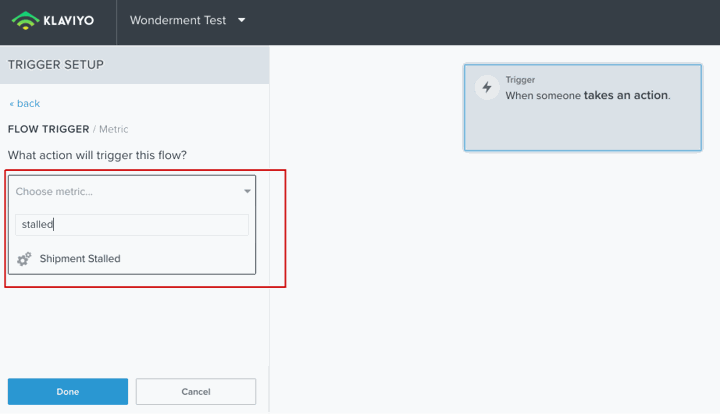
Now you’re ready to start building your first Klaviyo flow. Start by creating a new flow (from scratch) and choose Metric in the list of options on the left.
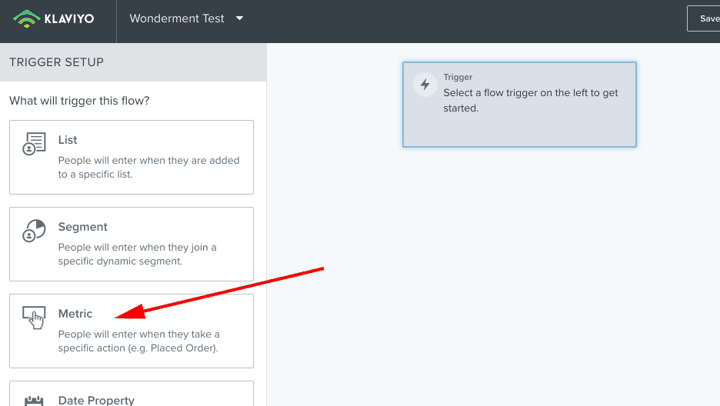
From here, you can find any of Wonderment’s shipping events in the dropdown list, or can use the Search field to find them quickly. For example, type “Stalled” in the search box and you will see the Shipment Stalled event appear in the list. Select this event and click Done.
Tip: Here’s the full list of shipping events you can use with Klaviyo.
3. Best practices for setting up a Stalled Shipment flow in Klaviyo
The example will walk you through the best practices for creating a stalled shipment flow in order to notify your customers about delay on their order.
Proactively notifying your customers about any potential delays has several main benefits:
- Reduces customer anxiety about the status of their order
- Helps prevent “where is my order?” support tickets
- Builds brand reputation by going above and beyond to support your customers
Best practices to creating delayed shipment notifications:
- It’s recommended to send these messages via email or SMS, instead of both. It can be overkill to send the same notifications in multiple channels. That being said, it depends on your brand and how your customers preferred to be communicated with.
- Timing is everything. You’ll want to avoid premature notification but don’t wait too long, either. We find that a package that has been stalled for 4-6 days justifies an alert to the customer (and longer for International orders). The example flow below will help you identify the perfect timing.
- In your communication, be honest, transparent, and helpful. Try out a simple, plain-text email coming from your CX team, and if possible, have these come from an email address that can be replied to and seen.
Looking for more tips? Check out:
- Shipping Delay Examples: What to say to your customers
- How to Communicate Delivery Delays: 7 Excellent Email Examples
- 5 Great SMS Shipping Update Examples
How to create a Stalled Shipment flow in Klaviyo
In this tutorial, we’ll show you how to create this stalled shipment flow below:
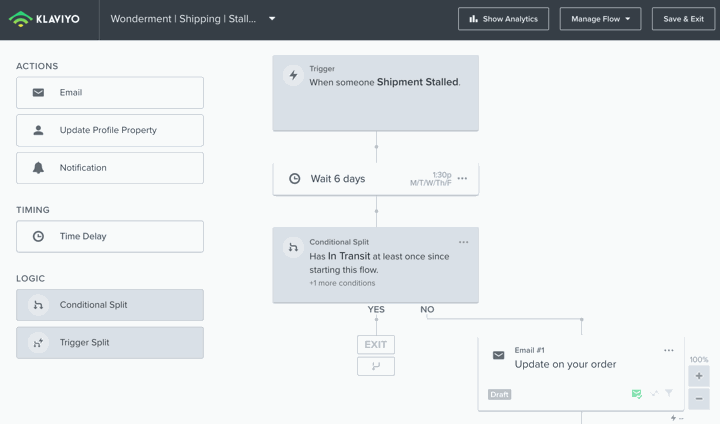
In this flow we include:
- Time Delay. Why? This is how you determine how long a package is stalled before the customer is notified.
- Conditional Split. Why? This remove customers who no longer have a stalled shipments
- (Optional) Time Delay to send emails after specific times of day and days of week. Why? Set emails to only send Monday-Friday and in the afternoon as we find packages are scanned less over the weekend and usually catch up Monday mornings, which will avoid unnecessary delay emails from slow weekends.
How to create this flow: step by step Instructions
Step 1: First, make sure to follow the steps in section 1 above to building your first shipping flow in Klaviyo.
Step 2: Once you select a Metric-type flow in Klaviyo, search and find Shipment Stalled in the drop-down list.
Step 3: Next, add a Time Delay into your flow right after the metric trigger you just created (it will read as When someone Shipment Stalled).
“Set this delay for” somewhere between 4 to 8 days to start. This means that an order will have to be stalled for at least X number of days before it sends an email. (Optional) set a specific time-of-day for the afternoon and select Monday-Friday for days of the week. Then click Save.
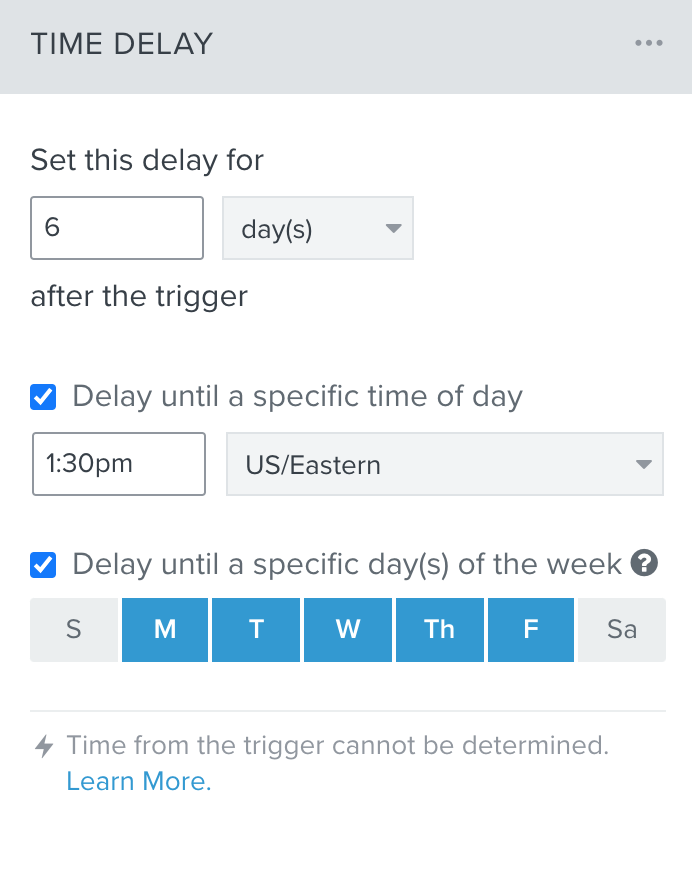
Note: Keep in mind that the # of days you specify in your Time Delay will be in addition to the number of days you have set as your stalled shipment interval in your Wonderment settings.
For example, if your interval is set to 48 hours, and your time delay in your Klaviyo flow is set to wait 6 days, the package will end up being a total of 8 days delayed before it sends an email to the customer.
Step 4: Next, drag a Conditional Split under the Time Delay you just created. Under the Configuration settings of the conditional split in the left-side of the screen, select:
- What someone has done (or not done)
- Person has: In Transit
- At least once
- Since starting this flow
Click Save.
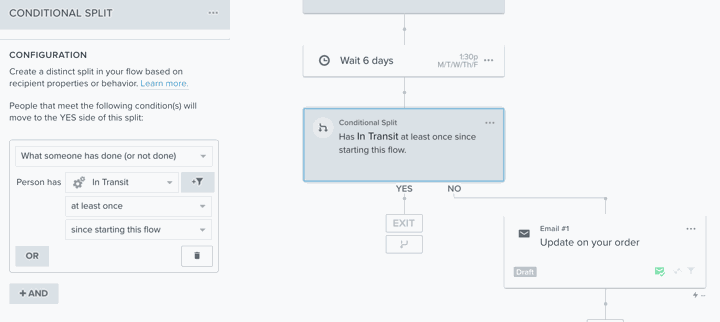
Step 5: Next, drag an Email under the NO branch of the conditional split. You can then create your email content or use an existing template.
Note: Steps 4 and 5 are important as they remove customers from the flow once their package is moving again and no longer stalled. If you don’t set this condition, customers who no longer have a delayed shipment will receive this email (no bueno!).
4. Advanced segmentation
In some cases, you may want to specify different time delays depending on an order’s destination or what carrier is delivering the package.
For example, in Klaviyo, you can specify a greater time delay on International orders as these usually take longer to arrive or clear customs.
Or, you can segment your flows by carriers that typically take 7-10 to ship vs carriers that are a guaranteed 2-3 days to ship.
Here’s how….
A. International vs Domestic
In order to set a longer waiting time delay on International orders, add a Trigger Split using DestinationCountryCode in your flow.
For example, if you ship from the United States, you’ll specify the DestinationCountryCode as US and then any emails under the NO branch will be considered International orders.
To do this, drag a Trigger Split into the flow. In the trigger’s Configuration options, in the Dimensions drop down, select DestinationCountryCode, then in the Dimension Value field, under your country’s code (find the list of country codes here).
Here is how the flow will look when you split domestic and International orders. You can see I set a 3-day time delay for delay for US orders, vs a 10-day time delay for International.

B. Carrier-specific flows
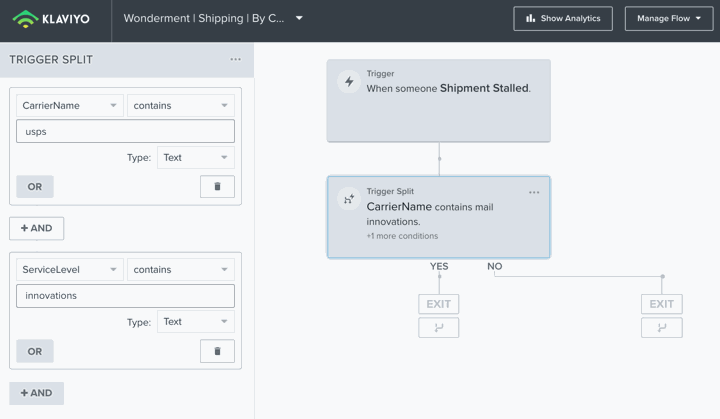
To segment stalled shipments emails by carrier, add a Trigger Split and then use dimension/event CarrierName.
To do this, drag in a new Trigger Split into the flow. Under Configurations of the trigger settings, in the Dimensions drop-down, select either Carrier Name, and then enter the name of the carrier in the DimensionValue field. The click Save.
(Optional): You can use an additional trigger of ServiceLevel to drill into the specific service level of the carrier. Example: USPS (carrier name), Priority Mail (service level).
Here’s an example of how that will look:
Tip: You can find the full list of Carrier Names and Service Levels here.
C. First-time vs returning customers
You also have the option to send different shipping notifications to first-time vs returning customers.
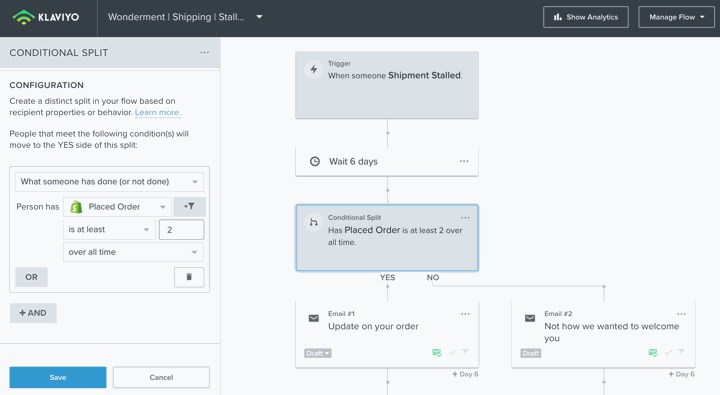
To do this, simply add a Conditional Split into your flow using the Placed Order event.
In the configurations of the conditional split, select:
- What someone has done (or not done)
- Person has: Placed order
- Is at least: 2
- over all time
Click Save.
Then proceed to add an email under each YES and/or NO branch. Here’s what that looks like:
5. Using Klaviyo to send internal notification regarding stalled shipments
Using Wonderment + Klaviyo not only enables you to send proactive emails to your customers, but you can send emails to yourself (or your CX/Support team), too!
To do this, you would add a Notification into your stalled shipment flow.
In this example, I added a Notification email to my existing Stalled Shipment flow:
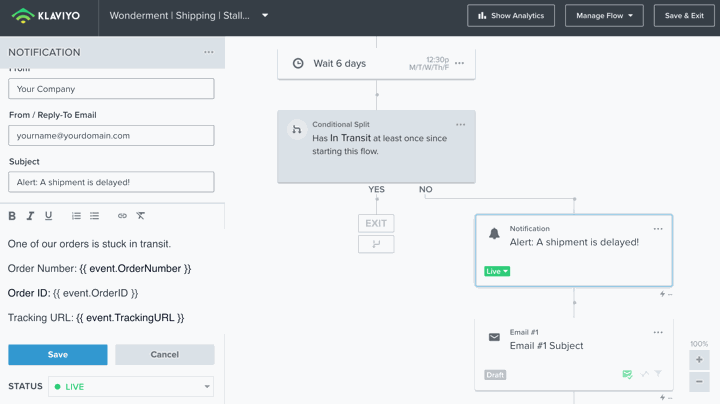
You can create this as a separate flow as well (although it will mean you have two flows to manage).
You can also set different Time-Delays in the flow for internal emails vs emails to customers. For example, you can specify to get notified after an order is stalled for 5 days, but have the email which gets to customers to send in 6 days. This gives you a 24-hour buffer to review these customer’s orders, if you’d like.
Tip: You also surface shipping alerts to your team via our Gorgias integration and in Slack, Zapier, and other tools via our webhooks.
6. Personalizing your email content with meta-data tags
When emailing customers about the status of their shipment, it’s best practice to include information about their specific order, such as their order number and tracking URL.
You can dynamically include these variables in the email content by inserting the appropriate meta-tags.
Here’s an example of including the Order Number in the email body:

Here’s the list of meta-data that Wonderment passes to Klaviyo and to other applications.
7. Using the In-Transit event
If you're looking to send transactional email once a package leaves the warehouse (e.g., "Your Order Has Shipped!"), you can use the In Transit event to kick off this flow.
But before you use the In-Transit event, there's something important you should know!
In-transit is not only a status, but an event that we emit into Klaviyo every single time there is an update from the carrier. This means that a customer will have multiple in-transit events in their record during the package's journey (for example, every time it gets accepted or leaves a carrier's facility). This in-transit event is important because it shows that the package is still moving and making progress to its destination.
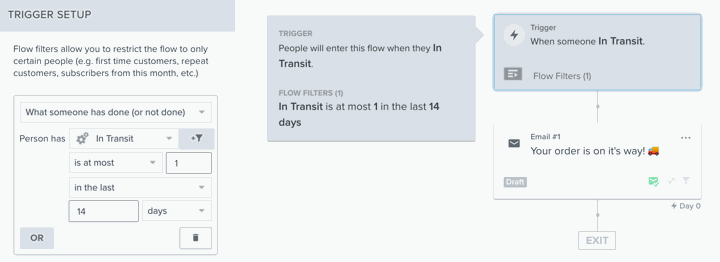
This means you'll need to add a Flow Filter to your in-transit flow in order to make sure a customer only receives one email. Without this step in the flow, the customer will receive an email every time there is an in-transit event.
To do this, add a flow filter that equals What someone has or has not done, Person has In Transit, is at most 1, in the last X days (x means number of days).
8. Extra Resources
If you have any questions at all about setting up your Klaviyo flows or using Wonderment, please reach out to help@wonderment.cc any time!
Here are a few additional resources:
- Integrating Wonderment + Postscript for SMS shipping notifications
- Shipping Delay Examples: What to say to your customers
- How to disable Shopify’s default shipping emails
- What carriers does Wonderment support?
Questions? Reach out to help@wonderment.cc


.svg)
